Welcome to KMBL 103
Classroom Guide
The information below will give you a quick overview of everything you need to know to use this room successfully. Scroll down for more in-depth details about each area.
shortcuts
Room Resources
There are 68 stations for students, 3 whiteboards, 2 projectors, a room camera, a presentation remote, a document camera, a wireless mic, and two spare, moveable desks and chairs. Additional whiteboard markers can be checked out at the front desk.
Available Software
Software specific to this room:
R
RStudio
Software available by default:
Box
Microsoft 365 Suite (Word, Excel, PowerPoint, etc.)
Microsoft Teams
SPSS 31
Stata 19
*If you're missing any software you can find it and install it by using Software Center

Presenter Station
Computer Log-in
Use your BYU NetID and Password.
Projector/Camera Interface
There is a small, black box with a screen to the right of the computer. This is the interface you will use to switch the input for the projector and control the camera.
If the screen is all black, tap on it to get started. The screen should light up, and you will be in one of three menus. You can change which menu by pressing on its name at the top of the screen.
-
Toggle ItemDisplay
Here you can switch which input the projectors will display. You should see two large buttons labeled "Display 1" and "Display 2". Display 1 refers to the projector and its associated TV to your right. Display 2 refers to the projector and TV to your left.
Below these large buttons, you will see six smaller labeled buttons.Blank - Turns off the selected projector display. This does not fully turn off the projector, so this is good if you want to hide your screen.
PC Main - Your computer's main screen is mirrored.
PC Extended - The secondary monitor to the left of the main screen is mirrored.
HDMI Port - It is located in the stand below the podium computer to the right. If you have a cable, it will display whatever is plugged directly into the HDMI port.
HDMI Cable - It is connected to the podium computer and placed on a desk to the right. It will mirror whatever device is plugged into the available HDMI cable connected to the podium.
Doc Cam - The document camera's view is displayed.
-
Toggle ItemAudio Control
Here you can adjust the volume of the room's speaker system and the wireless mic. The best way to control volume level depends on what type of device you are using for audio.
PC: Use the audio controls on the PC itself to adjust volume. The controls on the podium touch panel will do little to nothing to adjust volume.
Mac: Use the podium touch panel to adjust volume. It's part of Mac OS to disable the audio control on the mac itself when using HDMI to output audio. In this room, the volume controls are connected to the displays. Unless you want to have two different audio sources playing at once, just use the master volume control.
Wireless Mic: You can find the wireless mic on the podium next to the monitor. To turn it on on simply use the switch on the top side of the microphone. To adjust the volume use the podium touch panel. Go to Audio -> Microphones -> Wireless.
Regardless of what type of device you use, be careful when adjusting volume as the controls are sensitive.
-
Toggle ItemCamera Control
Here you can switch between several preset camera perspectives, or manually position the camera using the directional and zoom buttons. If you'd like to see what the camera is recording, use either a zoom meeting or go to the website shown in the bottom left of the screen. This website will allow you to remotely control the camera.
For room control, go to cameras.av.byu.edu
Enter code: (find it on the display)
-
Toggle ItemPresenter Remote
There is a wireless presentation remote that lets you control slides from a distance. It is also programmed with controls including page up, page down, volume control, full-screen, pointer button, and a button for blacking out the screen.
To connect it to the podium computer or your personal device, plug the USB receiver into a USB port on the device.

If you need immediate help, reach out to the lab assistants at the front desk. If they can't solve the problem, pressing the "help" button in the top right of the screen will bring up the contact information for OIT's Audio-Visual (AV) support team.

The Document Camera
To control the document camera, use the WolfVision remote.
The power button is on the bottom of the remote. If there isn't a small square of light projected onto the desk next to the computer, then the doc cam is off. That small square of light indicates the doc cam's view area.
You can focus the doc cam using the autofocus ("AF" button ) or the manual focus controls in the top left. Adjust the zoom using the zoom buttons on the remote to fit the entire document or the desired section within the display area.

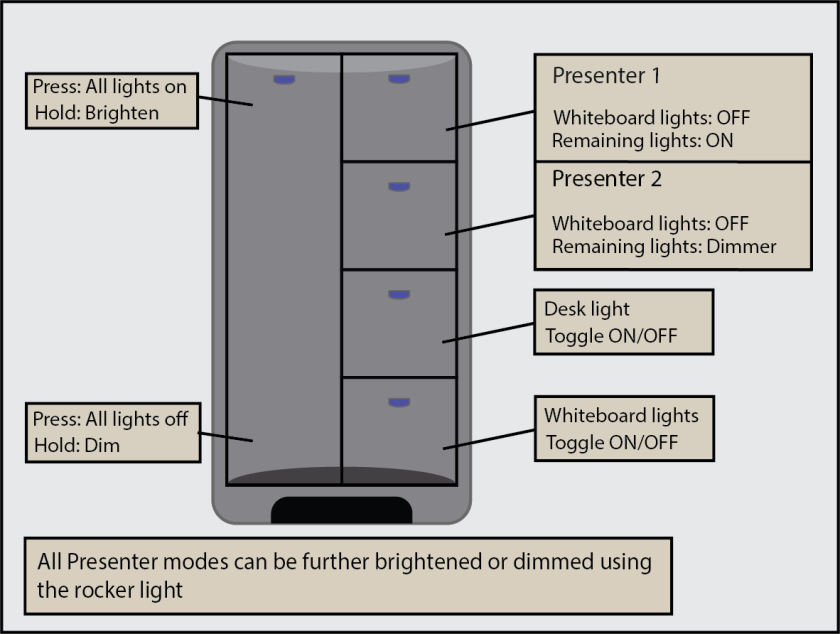
The Lights
There are three light switches in this room. There is a switch by each door, just to the right as you come in. The third switch is behind the podium, below the center whiteboard.
All switches control the lights in tandem and have the same functionality. There are 5 buttons, a large one on the left and 4 smaller buttons arranged vertically on the right. As you read the descriptions below you can reference the infographic for specifics on what it looks like.
The Large Button
Press on the top half to turn all lights on and press on the bottom half to turn all lights off. You can press and hold on either the top or the bottom to brighten or dim the lights respectively.
The Top 2 Small Buttons
These are the presenter modes. These buttons turn off the lights closest to the whiteboards and projector screens while leaving all other lights on. Presenter mode 2 is a dimmer version of presenter mode 1.
The 3rd Small Button
This button toggles the lights above the desk space for the document camera.
The 4th Small Button
This button toggles the whiteboard lights on or off. This works while in any of the presenter modes.

The Projector Screens
To raise and lower the projector screens, use the buttons next to the light switch behind the presenter's station. The "up/down" buttons automatically raise or lower the screen fully. If you want to stop the screen at a particular place, use the "stop" button. Please do not pull on the screen to lower it
Scheduling
Classes: Schedule through BYU Campus Scheduling or FHSS Events Coordinator
Rachel Dial
rachel_dial@byu.edu
KMBL 990B
Temporary bookings (Events, TA reviews, study groups, etc.): Contact the FHSS Labs Team
KMBL 101
fhsslabs@byu.edu
KMBL: (801) 422-1185
Contact Us
KMBL 101 & JFSB 1053
fhsslabs@byu.edu
KMBL: (801) 422 -1185
JFSB: (801) 422-8525